

How To Clean Yellow Stitching On Doc Martens
Disclaimer: All Dr. Martens-related media is official Dr. Martens media used for authenticity. Property of Dr. Martens, © 2022 Airwair Intl. Ltd I believe I wrote somewhere in the description of this weblog that I would exist sharing 'knowledge'. At this point in time I have but one piece of cognition that I believe tin be of service to you. Allow it be known that there is absolutely zip connection to Japan or linguistic communication here. This post has to do with Dr. Martens boots. I will write a fiddling bit about how to choose a proficient pair and an introduction on how to treat and maintain them. The reason I am writing this: I had difficulty finding the information regarding care after I got my boots. This required me to become back to the store and go the information straight from the source. Once I had it, I thought information technology would be of do good to others to share it here, along with sharing my experience.
Then, final Christmas my wife bought me a lovely new pair of black Dr. Martens 1460 boots. I thought they were nifty and I likewise had a pair as a teenager, then I was glad to receive them. Nevertheless, because it was a souvenir and we wanted to be sure I got exactly what I wanted from amongst Dr. Martens' vast array of styles and offerings, nosotros went to the shop and browsed around to brand sure at that place wasn't something more than eye-catching.
I ended upwards speaking to the salesman in that location for some time. He was extremely knowledgeable, enthusiastic and helpful. To make a long story curt, I shelled out a piddling more on top of the original price to go my hands on the exact same 1460 boots, but in their 'Vintage' format.
Vintage….and brand spanking new, too!
If y'all read this Wiki commodity you lot will learn about the fascinating history of Dr. Martens and also discover that they still have their Cobbs Lane factory in Wollaston, England, where the 1460 model boots first started production in 1960. For a short time between 2003 and 2004 it closed downward due to an attempt at fiscal turn-around, but it was re-opened in 2004. Today, it produces a limited number of Dr. Martens the onetime fashioned way.
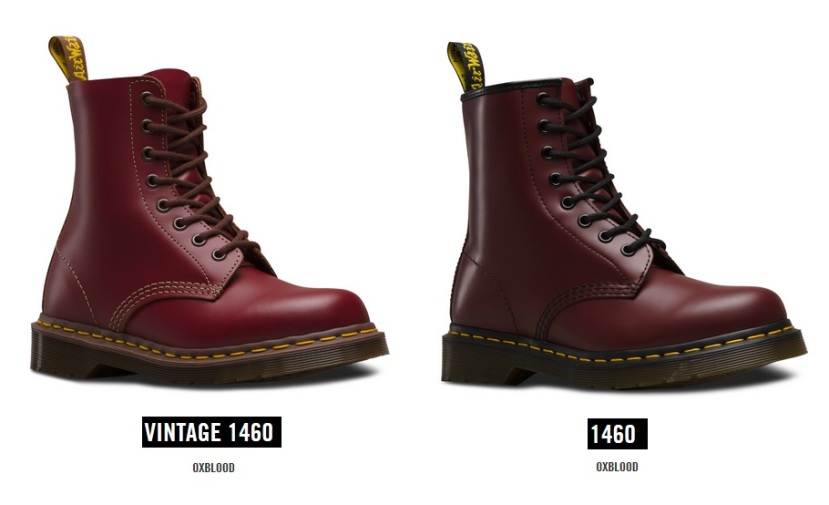
I cannot describe the difference between the normal 1460s and Vintage 1460s, other than to say the Vintage truly gives yous a sense of being "the real deal". The rough grain of the naked interior leather and "Made in England" stamps are the two main visual cues, in improver to the lovely cream stitching used on the oxbloods. They also come in a much nicer regal box and accept the "Made in England" tag fastened to the eyelet when you first unbox them. This information is non pertinent to this article per se, only if you have whatsoever difficulty determining whether you lot're buying the real commodity from a local shoe store, these are the cues to look out for.
Compared to the 1460s made overseas, the leather and adroitness of the Vintage are across a doubt worth the extra funds. They have that strange, yet, attracting quality of 'something fabricated ages agone simply brand new', almost as if you've bought a pair that got sent forward from the 1960s in a fourth dimension machine. It is literally like owning a piece of history, because you're able to wear the same boots all the cool kids use to stomp around in back in the twenty-four hour period.

Regarding the procedure of producing a pair of Dr. Martens boots, here is a video to whet your appetite. Videos like this are called "something-porn" these days (i.e. nature videos are "Globe-porn" and sports car exam drive videos are "car porn") due to the most voyeur like and up-close nature. I guess this is boot porn with a splash of … engineering porn? Machine porn?
The Boots
If we look at a side-by-side comparing we see that the Vintage boot has a nice, naked quality to the leather because the interior and edges of the boot are left un-dyed and uncapped. This is visible forth the eyelets, immediately distinguishing them as 'Fabricated in England'. When you're not wearing them, seeing the exposed, unfinished leather of the boot's interior is actually quite squeamish. It throws you into a mini time warp, back to an historic period when everything was made with simplicity and sturdiness in mind.

On the oxbloods below, the stitching along the quarter, the vamp and heel area is done in a lovely cream colour, also making them easily distinguishable equally Vintage. The jug loop is also tinged Oxblood whereas the overseas version seems to use the standard blackness jug loop. The same naked edges and interior are also nowadays in the oxbloods.
All discussions of purism bated, I personally prefer the Vintage later having held both in my paw. The experience of the leather, the subtle styling cues, the simplicity of the untreated interior and edge surfaces and the heritage really come together and make a darn fine boot.
How to brand'em final
Although information technology would be a good idea to treat whatever boot or leather product with the aforementioned care, the Vintage boots peculiarly cry out for proper care and protection against the elements. In that location'southward too the fact that you lot've spent a little bit more and wish to make your buck final as long every bit possible. Intendance is recommended for all Dr. Martens products, although the various styles use different materials and colors, and then it is e'er best to inquire your local store managing director or sales rep for precise care details if y'all have one of their funkier products. Hither, I will be introducing the basic intendance routine and care products used for leather Dr. Martens regardless of color, as it was explained to me by my trusted and knowledgeable sales rep.
The Dr. Martens Shoe care kit
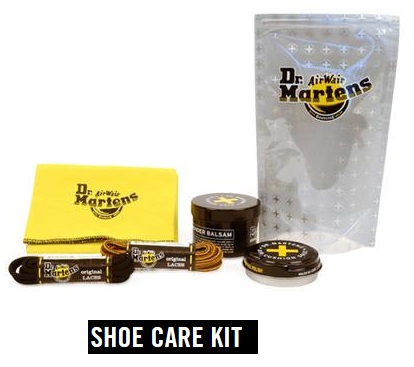
This kit contains your basic care products for leather shoes and boots regardless of color. Information technology contains the Wonder Balsam, Dubbin, a rag and ii sets of spare laces. The purse itself is sturdy and tin exist sealed, making it a suitable place to continue keeping the polishes and rag. The kit does non include a buffing brush. The brush is sold separately.
By the way, the extra laces were a footling longer than the ones that came with my boots. I don't know if this will always exist the example for all boots, but assuming information technology is I would say that length-wise the stock laces are good for lacing to the pinnacle and tying off, while the replacement laces are good for lacing to the top, wrapping around the ankle one time and then tying off. Personally, I adopt my boots laced with the longer replacement laces, so I put them in immediately. When you treat your brand new boots or fifty-fifty when treating older boots y'all will want to remove the laces anyway, and then this is always the perfect opportunity for switching laces.
To Dubbin or to Balsam, that is the question.
Hither is the prized data which I had trouble finding and spurred me to write this whole thing. Whether information technology is due to my lack of Googling skills or my failure to read the Dr. Martens website properly, equally of Christmas 2022, I simply could not find any information nigh when and nether what circumstances to apply the Balsam and/or the Dubbin. Which comes first? When does i use either or? Are there cases when we use both?
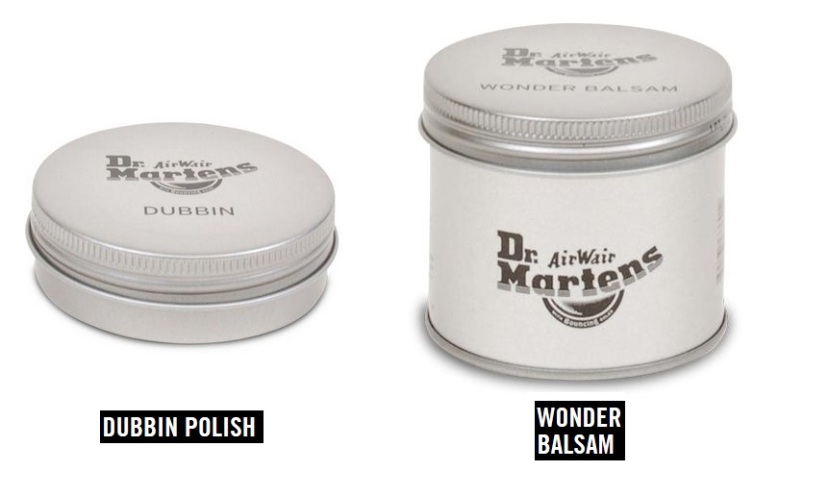
The Dubbin
This is a very waxy product which reminded me slightly of petroleum jelly. This product is for protecting your boots confronting the elements. This is your first line of protection, so it volition ever exist the LAST thing you apply. For new boots which have no damage or habiliment and tear, you will apply the Dubbin right away (especially during winter or rainy flavour) so equally to protect the boots right out of the box.
To apply, utilize a rag (I used the included rag) and work it liberally into everything – the seams, the stitches, everything (save for, of grade, annihilation to do with the interior of the boot). The Dubbin will article of clothing off in time or it can be washed off along with the clay it collects whenever desired. The thinking is as follows – put this production anywhere you lot don't desire dirt, salt, water, etc. getting in. When you employ the Dubbin you can imagine yous're getting your car oil-sprayed before the winter. The grit volition collect a little easier and then if you lot are a dandy freak you may non like the Dubbin, merely the alternative is to accumulate table salt stains, water-damage, and dirt particles in the seam holes over time. My advice: keep a-rubbin' the Dubbin if you lot desire your boots to concluding.
The Wonder Balsam
This is your moisturizer, toner, vitamin E cream, any y'all want to retrieve of it as. It soothes and revitalizes the leather and prevents excessive wear and tear which, if left unattended and dry out over time, tin pb to the development of rips and holes. This will always go on a clean, dry surface earlier the Dubbin. Remember, the Dubbin protects everything, so you want the Balsam straight on the leather keeping information technology moisturized and resistant to cracking etc., and all of that activeness protected nether the Dubbin.
To apply, apply a separate rag or your fingers and gently work it into all the areas which need revitalization/maintenance, such as the toe crease, the dimple that develops in the heel, and along the natural folded areas such equally the tongue crease nether the eyelets. For convenient awarding the production also comes with a sponge. Dab a bit on and work information technology in over the larger surfaces. Just like your face up, the goal is not to slather it on but to spend time working it in and ensuring it penetrates evenly. If yous have applied the Dubbin previously, you will demand to launder the boot before applying the Balsam so you lot take a clean surface to work with, otherwise the Balsam volition not penetrate the leather well, or worse yet, you'll merely be working dirt and onetime Dubbin into the leather.
Washing the boots
This is best done using a clean material (yeah you'll develop a nice drove of rags and cloths) and some warm water. An old toothbrush can also be employed for stubborn areas, in fact I recommend it for patting and breaking up crusted dirt and table salt and lifting it away from the yellow stitching. Some people even use saddle lather. Dr. Martens also has their own brand of cleaner available. The sales rep said soap was an choice just not 100% necessary. Ultimately the use of soap is a personal decision, but if you exercise use lather brand sure it's something for leather and not dish lather or something.
After washing the boots information technology is recommended that yous wait 24 hours or at least overnight for them to naturally air dry earlier applying anything. Afterward the boots are dry y'all tin utilize the Balsam, and a few hours afterwards that the Dubbin can go on if desired. (In the centre of summer when information technology's dry there may be times when Dubbin is not even necessary).
In summary:
New boots: Apply Dubbin as needed.
Older boots: Launder → Let dry out → Apply Balsam → Let set → Apply Dubbin as needed.
And that's how you utilise your Dr. Martens Shoe Intendance Kit with your new or old leather Dr. Martens boots or shoes.
Determination
So at whatever rate, if y'all're lost between the Vintages and the regular 1460s I highly recommend the Vintages. If not for purist motivations, so at least for the better build quality and styling accouterments. Therein, to protect your investment you'll want to pick up the bones care kit. Even if you already ain a pair of 1460s but have forgone the care kit at buy, become become it at present if y'all'd like to spruce the quondam gals upwards a bit. Keep your boots clean. Keep the leather conditioned with the Balsam to avert premature article of clothing. Keep the clean, conditioned leather protected from the elements with a terminal awarding of the Dubbin.
Hope you institute this helpful!

Source: https://tekipaki.wordpress.com/2016/01/23/a-practical-beginners-guide-dr-martens-1460-boots/
Posted by: sturgilloures1983.blogspot.com
0 Response to "How To Clean Yellow Stitching On Doc Martens"
Post a Comment